I have been wanting to make a fun Halloween cake for some time and finally was able to do it. I have slowly been collecting the materials from the craft store with my 50% off coupons! On my last trip I found a pack of clay cutters in squares and circles. After thinking about my Frankenstein cake and looking though my tools I thought he would be more fun with a square head! I am a beginner with polymer and am still learning each time I make something so if you are a beginner too I encourage you to have fun with this!
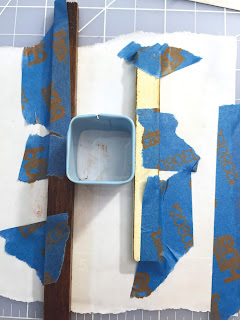
First line up two pieces of wood the thickness that you want each cake piece to be and the width of your cutter.
Then roll out some brown polymer clay inside of them and cut out your cakes. I cut three of them.
I mixed in some yellow with my green clay to get it a little brighter.
Next, roll out the green clay to a log with your hand and then with a roller to about 1/16” thick and cut two of those with the same cutter you cut the brown with. Be sure to clean any brown clay off of it first!
Stack them all up making sure they are even and straight.
Now roll out the green clay to a longer log again with your hand and then with a roller to about 1/16” thick. Lay your cake on it and cut the height from top to bottom.
Lay your cake above it and roll it to determine how long of a piece you will need to wrap the cake. Trim the piece of green clay.
Start wrapping in on one side and then all the way around. I pressed it from two sides at a time with flat pieces of hard plastic to get it firm.
Cut a slice out of it with your craft knife.
Make some texture with a needle tool and an old toothbrush. I made the mistake of not zooming in on my photo to check my texture before baking it. So do that or use a magnifier to be sure it is textured enough.
Give the middle icing some texture as well.
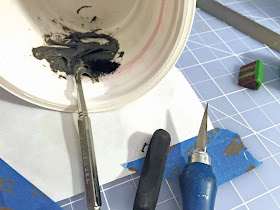
I save my yoga cups for just this sort of thing. Roll some black polymer very thin and break off pieces and put it in the cup. Then squeeze some liquid polymer on it.
Work it with a small spatula. I used a manicure tool.
I added some black pastel shavings to make sure it was very black.
When it gets to the consistency of icing put it on the top and down the sides like his hair would be. Don’t forget to add some to your cake slice too.
Back both the cake and slice according to the manufacturer’s instructions. Let it cool.
Find something to cut out the white clay for the eyes. I used a mini glass of orange juice. I their pen caps but they were a tad too big. If the clay gets stuck in the glass use your blade tip to get it out. Don’t worry about denting in a small section.
Now cut the tops off the circles, a little less than half the circle. If you did leave a dent in them cut of that section.
Roll up a tiny piece of black and press it flat into a circle for the pupil. Cut the tips off of those as well.
Use a toothpick to put a tiny spot of bake and bond where the eyes will go and press them down gently. do the same with the pupils.
Roll out some black for his eyebrow. Trim it to the correct length put a tiny bit of bake and bond down and press it on over his eyes.
Roll out a very thin piece of black and shape it for his mouth. For this I just held it and used y toothpick to dab on some bake and bond then pressed it on the head.
Put a spot of bake and bond on his cheek and place tiny rolled pieces there for the stitches.
Roll a green ball, press down with your finger, and cut in half with your knife.
Put a spot of bake and bond on both sides of his head where is ears will go and put them on.
For the bolts I mixed black with a tiny amount of white, made a small ball and put a spot of bake and bond where i wanted the bolt and placed the ball there on both sides.
Then I cut two tiny squares and put a spot of bake and bond on the grey balls and adhere the square to them.
Bake again according to the manufacturer’s instructions. Let cool.
I painted the icing with satin varnish but it was too shiny so I painted the entire outside with matt varnish. Don’t paint the actual cake inside. Let dry.
Isn’t he handsome? Perfect for a Halloween party!
You can make a knife from card stock. Cut the blade out then glue two small pieces of black together. Cut each of those to be the handles and glue them on either side of the back of the blade. Color the edges black with a marker and add two silver dots on the handle.
Serve up some Halloween fun!


