The beautiful angle wing candleholder and vintage rabbit book were gifts from Pricilia
at
TresPetite Dollhouse Miniatures on Etsy.
This is a faster way to weave a wicker bowl without
having to struggle with many pieces of wire. Choose a paper close to the color
of the basket you wish to make. I used regular thin paper, but you can try a
thicker paper or even thin vinyl would work. I will say the gentler you are
with your string as you weave, the easier it will be using thin paper. You also
want to find the thinnest hemp string that you can.
Trace the pattern onto your paper. Cut out using a
craft knife.
Tuck the hemp string into one of the slots and
secure it against the back base with your finger.
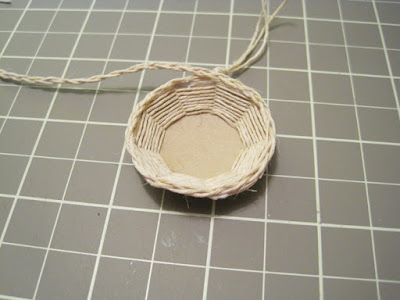
Begin to interweave the string around the pattern.
Go over and under the tabs.
As you weave around gently pull a bit tighter to
make the tabs move upward to form the dish shape. Push the string down on the
tabs as you go if there are gaps.
When you get to the height you want, cut the string
and put a dab of glue on the end of it and tuck it under the other strings with
a toothpick.
Trim away all the excess paper with scissors,
flipping the basket up and over for each tab so you can see the highest strings
on the tabs and don’t accidentally cut them.
Cut three 8” pieces of string and tie a knot at the
end. Tape it to your cutting board.
Braid the string nice and snug and then tie the end
into a knot.
Put some glue on the end, just before the knot, on
the top and bottom of the braid with the toothpick.
Run Tacky Glue around the top of the basket using
your toothpick.
Lay the braid along the glue, pressing it down as
you go.
Snip of the glued end of the braid in the center of
the area you glued before the knot. Press it to the basket edge.
Put glue under and over the other end of the braid
right where it meets the end you just cut. Snip in the center of that glued
area and press it to the end to complete the circle.
Spread some glue on the base and begin wrapping the
string from the outside in, until it’s completely covered. Do the same for the
base if you wish.
You can use a toothpick to move the strings on the
tab if you see areas where the paper shows through. This is why you want a
paper close in color to the string.
Make your template small for a smaller bowl. You can
also use embroidery thread or even thin yarn in pretty colors for this project.
If you do that then you can put coordinating fabric on the base instead of wrapping the thread.
Get your groove on and have fun weaving!


