My new blog is up and running. I hope you will be a part of my journey and that my dollhouse story will interest you!
http://thekinfelddollhouse.blogspot.com/
Sunday, January 3, 2016


Tuesday, December 29, 2015
A new 1:12-scale dollhouse build
I will be launching a new sister blog in January 2016 to represent my newest build, The Kinfeld.
Be sure to "Follow" it once it's up and running because it will be full of great tips, and fun photos! I will announce the launch here.
This house will be made from foam board and cardboard in 1:12 scale. I have been playing with this idea for a long time and have finally took it on.
Because I love creating fun stories and characters, once the build is complete it will be an ongoing photo journal about the spirited family that moves in and I will also be sharing lots of tutorials as I make items for the inside.
Here is a sneak peak of what will soon be a three-story Victorian style home with a modern touch.
More detail about the build will be on the new blog once it's up.


Be sure to "Follow" it once it's up and running because it will be full of great tips, and fun photos! I will announce the launch here.
This house will be made from foam board and cardboard in 1:12 scale. I have been playing with this idea for a long time and have finally took it on.
Because I love creating fun stories and characters, once the build is complete it will be an ongoing photo journal about the spirited family that moves in and I will also be sharing lots of tutorials as I make items for the inside.
Here is a sneak peak of what will soon be a three-story Victorian style home with a modern touch.
More detail about the build will be on the new blog once it's up.


This is Bradley, my mini-carpenter.

Sigh...asleep on the job, again!
Tuesday, December 8, 2015
Miniature Christmas garland


What better way to dress up the stairs and fireplace than to add a festive string of garland with big red bows!
This is a super easy little project that will definitely be more fun with Christmas music playing. So set up a Pandora Christmas station or line up some holiday CDs in your player and let’s get creative!
Cut a thin green wire the length of your garland. Fold the end over.

Pinch off three small sections, of lycopodium, also known as prince's pine,princess pine or erica moss.
Wrap green thread around the small bunch as well as the wire about five times and then overlay another bunch and wrap the thread around where the two bunches meet and then down to the end of that second bunch.

Basically you want each bunch of three to overlap over and over down the line.
Then add another bunch and wrap the thread in the same way and the same direction you did the very first two.
Continue this until you get to the desired length.
Once you come to the end of the strand put a dap of glue there and wrap the thread into it. Bend the end of the wire into the glue as well and let it dry.

Once dry you can snip the thread away.
Use a small pair of scorers to trim the garland shorter if desired.
Friday, August 14, 2015
There is a new mini show in town!
This will be the one to go to in Chicago next spring. I will be there. Will you?
http://www.theminiatureshow.com/
This will be the one to go to in Chicago next spring. I will be there. Will you?
http://www.theminiatureshow.com/
Thursday, June 25, 2015
Weave a miniature basket with no wires!
 |
The beautiful angle wing candleholder and vintage rabbit book were gifts from Pricilia at TresPetite Dollhouse Miniatures on Etsy.
This is a faster way to weave a wicker bowl without having to struggle with many pieces of wire. Choose a paper close to the color of the basket you wish to make. I used regular thin paper, but you can try a thicker paper or even thin vinyl would work. I will say the gentler you are with your string as you weave, the easier it will be using thin paper. You also want to find the thinnest hemp string that you can.

Trace the pattern onto your paper. Cut out using a
craft knife.
Tuck the hemp string into one of the slots and
secure it against the back base with your finger.
Begin to interweave the string around the pattern.
Go over and under the tabs.

As you weave around gently pull a bit tighter to
make the tabs move upward to form the dish shape. Push the string down on the
tabs as you go if there are gaps.
When you get to the height you want, cut the string
and put a dab of glue on the end of it and tuck it under the other strings with
a toothpick.


Trim away all the excess paper with scissors,
flipping the basket up and over for each tab so you can see the highest strings
on the tabs and don’t accidentally cut them.

Cut three 8” pieces of string and tie a knot at the
end. Tape it to your cutting board.

Braid the string nice and snug and then tie the end
into a knot.
Put some glue on the end, just before the knot, on
the top and bottom of the braid with the toothpick.

Run Tacky Glue around the top of the basket using
your toothpick.
Lay the braid along the glue, pressing it down as
you go.

Snip of the glued end of the braid in the center of
the area you glued before the knot. Press it to the basket edge.
Put glue under and over the other end of the braid
right where it meets the end you just cut. Snip in the center of that glued
area and press it to the end to complete the circle.
Spread some glue on the base and begin wrapping the
string from the outside in, until it’s completely covered. Do the same for the
base if you wish.

You can use a toothpick to move the strings on the
tab if you see areas where the paper shows through. This is why you want a
paper close in color to the string.

Make your template small for a smaller bowl. You can
also use embroidery thread or even thin yarn in pretty colors for this project.
If you do that then you can put coordinating fabric on the base instead of wrapping the thread.
Get your groove on and have fun weaving!
Get your groove on and have fun weaving!
Tuesday, June 23, 2015
Wednesday, December 24, 2014

Tuesday, December 23, 2014
Miniature cottage windows
I finally finished making the little windows to go in my new cottage. :-)
Still trying to figure out my new camera though. :-/
Can't seem to get it to focus on everything in the frame and not just the center point.
Anyway, they turned out pretty cool!

Now I just have to put them in. I made the handles from paper, but glued them at the wrong height so I had to flip the windows upside down and now the handles are at the correct height, but on the left side instead of the right. Haha Oh well, perhaps the resident is left handed!
Next up will be shutters!
Still trying to figure out my new camera though. :-/
Can't seem to get it to focus on everything in the frame and not just the center point.
Anyway, they turned out pretty cool!
Now I just have to put them in. I made the handles from paper, but glued them at the wrong height so I had to flip the windows upside down and now the handles are at the correct height, but on the left side instead of the right. Haha Oh well, perhaps the resident is left handed!
Next up will be shutters!
Make a miniature Christmas stocking


I decided to add some stockings to my little fireplace for Christmas. Note that these stockings are before Santa pays a visit! If I only
had a mini glass of milk and some cookies.

Trace the stocking pattern onto the backside of the fabric.
Be sure to flip the pattern piece when you trace the second one.
With a very sharp craft knife, cut the corners as shown on
pattern (dotted lines on pattern).
Use a toothpick to spread Tacky Glue along the edge of the
stocking and fold over the extra fabric. I use the other end of the toothpick
to fold and press each piece. Press again as you go to be sure the fold stays
down.

Cut some felt to fit inside the stocking.
Using your toothpick run glue all around the edges, but not
the top opening of the stocking. Press the pieces together and keep pinching
until they are adhered.

Once dry, use sharp scissors to trim away anything that is
not even around the edges.
Use your choice of trimming around the top. Glue the trimming
on.
Wrap embroidery thread around a 1/2" wide piece of mat
board 3 times and cut.
Thread a needle and insert it at the top and pull through
until you have enough thread to tie two knots. Trim thread off the needle so
you have at least one piece of thread about 4” long.
Push the craft knife under the thread at the base of the
wrapped thread and slice it off the board.

Pinch the top and push the threaded needle through the pinched
area and then wrap in around about seven times. Then push the needle through
wrap and push it through again. Snip the thread off close to the tassel.
Lay the tassel on your cutting board and run the tip of the
needle through the embroidery thread to open up the strands. Press in between
fingers to shape.
Put a dab of glue on your finger and twist it up the tassel
string on the top. Let dry.

Put a blob of glue inside the back of the stocking. Position
the tassels where you want them and pinch them against stocking. Snip the
threads on the top of the tassels and push them inside the stocking into the
glue with a toothpick. Pinch and hold until set.
If needed put a bit of glue behind the tassels to keep them
against the stocking.

There are so many styles you can make! Have fun!
Sunday, December 14, 2014
antiqued mirror in miniature
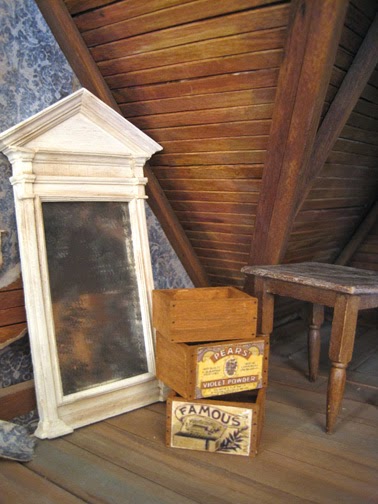
I was given this little mirror as a gift and I knew right away I wanted it to be an attic treasure. After researching online about how to age a mirror I found some really cool techniques for a life size mirror using a piece of glass, but had to come up with my own solution for a mini mirror.
It's a pretty basic technique, but I thought maybe someone out there would like to know...
First, I used a course brush to stipple on some grey paint and dabbed it immediately with a crumpled up napkin. Then stippled spots of black and dabbed it again.


Even though old mirrors are chipped and discolored the fronts are still shiny. Because the paint dulled the shine, the acetate helped to give it a shiny effect.

I painted the mirror cream and rubbed some brown charcoal on it with a course brush before I assembled it. Such a fun addition to the attic!
Saturday, December 13, 2014
Miniature grandfather clock shelf

I finally found some time to make this piece I have been thinking about!
I managed to take some photos during the process. I hope this tutorial inspires you to make one of your own.
Cut out the patterns on mat board. I used a very sharp craft
blade.
NOTE: When cutting out the clock face backing and cupboard
door frame, use cereal box cardboard.

Gently sand the edges if necessary for the two side pieces. I used a foam-centered nail file.
Using yellow wood glue, run glue along the edges of the back
piece and brace it between the two side pieces with a toothpick. I used two
small square boxes with some weight to them to help brace everything while it
dried.
Put glue on the back and side edges of the 5 shelf pieces
and slide them into the appropriate slots.
Put glue on the top edges of the shelf and glue on the top
piece. The back of the top should be flush to the back of the shelf. Brace the
top against another box.
Glue the base front on and then both side bases. Gently
stand it up to be sure its even when the glue just starts to set. When you are
happy turn it over and coat some wood glue on the inside corners.


Score the corners on the cupboard door frame with the back
of your blade and glue the thin cardboard molding onto the cupboard door.

Glue in cupboard insets.

Glue in clock face insets. The door will rest on these, one above and below.
Glue the clock face onto the thin-board clock face backing.
Glue the cap on top and once set, glue the two tops onto
that.

Once glue is dry, paint entire piece and the clock face door
frame (do not assemble this piece yet). Sand and apply paint until you are
happy.

Drill holes for knobs on cupboard and clock face door.


Glue the clock face door on. Put glue on front edge of top
shelf and the top edge of clock face door. Set in, careful the door does not fall
into the clock at the top. Add acetate to back of door if you want glass there.

Put a dab of Tacky Glue on the curve of the cap, let it dry
just a bit and then place bead on the glue. Glue seed bead on top of bead. Let
dry and then paint.

Please keep in mind there may be piece you have to test fit
first and trim a bit. It will depend on how you place your pieces together.
Things may be off just a hair.

Friday, October 31, 2014
Francisco del Pozo Parés
I wanted to share this link. It was sent to me by Francisco del Pozo Parés. I am in the process of featuring his amazing miniature lighting in Dollhouse Miniatures Magazine - Jan/Feb. He is also a brilliant dollhouse designer/builder. He is from Spain and has a background in architecture and it shows!
I think you will love this!
http://www.fineminiaturesforum.com/index.php?/topic/456-building-materials-fa%C3%A7ades-ceilings-finishings/

~Auralea
I think you will love this!
http://www.fineminiaturesforum.com/index.php?/topic/456-building-materials-fa%C3%A7ades-ceilings-finishings/
~Auralea
Monday, September 29, 2014
Miniature Scarecrow
-->

I made his outfit and then used Raffia that was bound in
bundles with very thin wire and added thicker wire inside each bundle. I
slipped a bundle straight through the shirt from one arm to the other arms and then two pieces in the pant legs up to the chest and bent the arms hips and
legs to pose him. Then I trimmed the raffia and pulled apart the thicker pieces
to make them thinner. I will do a step-by-step tutorial when I have time to
make another one. This one was an experiment, so I needed to be sure it worked
first.
The Pumpkins
I used natural dried gourds as well as a few painted one on the left. You can buy these from the last of my inventory here. (scroll down to the bottom once you click the link).
-->
The hat is super easy and quick.
I used cross-stitch fabric and made the top section by wetting
it and pulling it over an object to shape it. I used a rubber band to hold it
in place over a hammer tip. Sprayed it with hairspray and let it dry overnight.

-->
Then trim it out and place it on more of that fabric and
cut a circle around it at least 3/4" out from the top of the hat area.

-->
I used a circle template to gauge the circumference of the
top and centered that on my circle rim. Draw the circle and cut out the center.
Snip all around the base of the top piece making 1/8" snips.

Slip it up inside the rim and put glue all around then flatted
the snipped pieces down on the underside of the hat. Once dry, trim the rim all
around even more if needed. Spin the hat in your hand as you scratch your nail
along the edge to make it look tattered.


I painted mine with craft paint and pressed the top down to
shape it. Once dry trim with ribbon or braided needlepoint thread and add a flower!

Subscribe to:
Posts (Atom)


