Labels

Showing posts with label miniature. Show all posts

Monday, October 29, 2018

Dollhouse Halloween cake


I have been wanting to make a fun Halloween cake for some time and finally was able to do it. I have slowly been collecting the materials from the craft store with my 50% off coupons! On my last trip I found a pack of clay cutters in squares and circles. After thinking about my Frankenstein cake and looking though my tools I thought he would be more fun with a square head! I am a beginner with polymer and am still learning each time I make something so if you are a beginner too I encourage you to have fun with this!


First line up two pieces of wood the thickness that you want each cake piece to be and the width of your cutter.

Then roll out some brown polymer clay inside of them and cut out your cakes. I cut three of them.

I mixed in some yellow with my green clay to get it a little brighter.

Next, roll out the green clay to a log with your hand and then with a roller to about 1/16” thick and cut two of those with the same cutter you cut the brown with. Be sure to clean any brown clay off of it first!

Stack them all up making sure they are even and straight.

Now roll out the green clay to a longer log again with your hand and then with a roller to about 1/16” thick. Lay your cake on it and cut the height from top to bottom.


Lay your cake above it and roll it to determine how long of a piece you will need to wrap the cake. Trim the piece of green clay. 
Start wrapping in on one side and then all the way around. I pressed it from two sides at a time with flat pieces of hard plastic to get it firm.

Cut a slice out of it with your craft knife.

Make some texture with a needle tool and an old toothbrush. I made the mistake of not zooming in on my photo to check my texture before baking it. So do that or use a magnifier to be sure it is textured enough.
Give the middle icing some texture as well.

I save my yoga cups for just this sort of thing. Roll some black polymer very thin and break off pieces and put it in the cup. Then squeeze some liquid polymer on it.
Work it with a small spatula. I used a manicure tool.
I added some black pastel shavings to make sure it was very black.
When it gets to the consistency of icing put it on the top and down the sides like his hair would be. Don’t forget to add some to your cake slice too.


Back both the cake and slice according to the manufacturer’s instructions. Let it cool. 

Find something to cut out the white clay for the eyes. I used a mini glass of orange juice. I their pen caps but they were a tad too big. If the clay gets stuck in the glass use your blade tip to get it out. Don’t worry about denting in a small section.

Now cut the tops off the circles, a little less than half the circle. If you did leave a dent in them cut of that section.

Roll up a tiny piece of black and press it flat into a circle for the pupil. Cut the tips off of those as well.
Use a toothpick to put a tiny spot of bake and bond where the eyes will go and press them down gently. do the same with the pupils.

Roll out some black for his eyebrow. Trim it to the correct length put a tiny bit of bake and bond down and press it on over his eyes.

Roll out a very thin piece of black and shape it for his mouth. For this I just held it and used y toothpick to dab on some bake and bond then pressed it on the head.

Put a spot of bake and bond on his cheek and place tiny rolled pieces there for the stitches.

Roll a green ball, press down with your finger, and cut in half with your knife.
Put a spot of bake and bond on both sides of his head where is ears will go and put them on.

For the bolts I mixed black with a tiny amount of white, made a small ball and put a spot of bake and bond where i wanted the bolt and placed the ball there on both sides. 
Then I cut two tiny squares and put a spot of bake and bond on the grey balls and adhere the square to them.

Bake again according to the manufacturer’s instructions. Let cool.

I painted the icing with satin varnish but it was too shiny so I painted the entire outside with matt varnish. Don’t paint the actual cake inside. Let dry.
 Isn’t he handsome? Perfect for a Halloween party!


You can make a knife from card stock. Cut the blade out then glue two small pieces of black together. Cut each of those to be the handles and glue them on either side of the back of the blade. Color the edges black with a marker and add two silver dots on the handle.

Serve up some Halloween fun!


Saturday, March 24, 2018

Easter Bunny sighting


Little Elizabeth thought the Easter Bunny would be a bit chilly while delivering his eggs in the early morning.
So she left him some warm tea and sweet treats. Secretly hoping to see him for herself, she took her time making sure the display of cookies was perfect. When she heard a rustling in the garden she quickly hid behind the post to have a peek.
He was much taller than she had imagined but his white coat just as fluffy.


His nose twitched and ears turned as he hopped onto the porch to enjoy his warm tea and a delicious cookie.
She could barely breathe as she stayed hidden behind him in the corner of the porch. With a twinkle in his eye and a few hops he was once again in the garden and on his way.


She watched as he left and gathered the sky blue egg that he tucked away in the flower bed.
Elizabeth thought the Easter Bunny was not aware of her spying eye. But you can be sure he is only seen when he wishes to be seen. Perhaps this magical sighting was a little present for her thoughtfulness and generosity.


Beautiful doll made by Iris Bodenbender. Easter bunny made by me! (Bunny has bendable arms, legs torso, and ears. Head turns. Sculpted, furred and dressed))

Wednesday, July 20, 2016

Three hedgehogs having tea...


I have written three story books and also created all of the illustrations about a character named Ophelia. A few years ago I decided to make a dollhouse that would depict Ophelia’s house from the book. I wanted it to be more of a mixed media art piece then one of my usual dollhouses so it is dark and mysterious. It also has a lot of heart as do my Ophelia stories.

In one of my books Ophelia continuously hears a mysterious tapping sound coming from the attic above her bedroom. So one night she has a wonderful dream on what the tapping might be. 

Here is a small section from my book…

On the night she had the dream, she had just closed her eyes to sleep and her mind decided to solve the mysterious noise for her. She dreamt that she heard the tapping sound again and was finally able to see what it was. 
   She opened the small attic door, crouched down to enter and tiptoed barefoot up the narrow steps that led to the attic. There she heard the tapping again. It was coming from the far end of the attic. 
She made her way past a stack of crates and some old dusty furniture. Peeking from behind a tall folding screen she saw a very small dining table that was no taller than her knee. Around it were three little chairs. In each chair sat a hedgehog. There, in front of her, were three hedgehogs having tea! 
   The one hedgehog, at the head of the table, had a pair of spectacles that sat on the very tip of his nose. He held his saucer and teacup with one hand and with the other stirred his tea using a tiny silver spoon. Then he tapped his tiny silver spoon on the edge of his cup. Tap, tap, tap. 
   The other two hedgehogs sat sipping their tea and nibbling on small cookies. Then once again, tap, tap, tap. It seemed so real. His little nose was black and shiny. His little brown eyes watched his spoon as he stirred and tapped. She didn’t want to startle them for fear they would spill hot tea all over themselves so she watched quietly. As they nibbled and sipped they made little purring sounds almost like a content cat would. Right about then, she woke up and rubbed her eyes. Ophelia stared up at the ceiling above her trying to wrap her mind around three small hedgehogs having tea and biscuits in her attic…

I was truly blessed to have found Miniature Artist Fanni Sandor to collaborate on setting this scene in the dollhouse. We traded for Ophelia’s book and limited edition prints to make it happen.
I had been dreaming about this scene and saving that tiny furniture since I started the house four years ago and never imagined I would be able to have such wonderful tiny hedgehogs with just the perfect details. She also made the cookies, tea cup, and the tiny silver spoon.

Here are some photos for everyone to enjoy. All my love to you Fanni!


Ophelia Under the Day Moon Ebooks are available on amazon. 

For more about Ophelia visit auraleakrieger.com

For more of Fanni Sandor's work click here!


Friday, August 14, 2015

There is a new mini show in town! 
This will be the one to go to in Chicago next spring. I will be there. Will you?

http://www.theminiatureshow.com/

Thursday, June 25, 2015

Weave a miniature basket with no wires!


The beautiful angle wing candleholder and vintage rabbit book were gifts from Pricilia at TresPetite Dollhouse Miniatures on Etsy.


This is a faster way to weave a wicker bowl without having to struggle with many pieces of wire. Choose a paper close to the color of the basket you wish to make. I used regular thin paper, but you can try a thicker paper or even thin vinyl would work. I will say the gentler you are with your string as you weave, the easier it will be using thin paper. You also want to find the thinnest hemp string that you can.

Trace the pattern onto your paper. Cut out using a craft knife.

Tuck the hemp string into one of the slots and secure it against the back base with your finger.

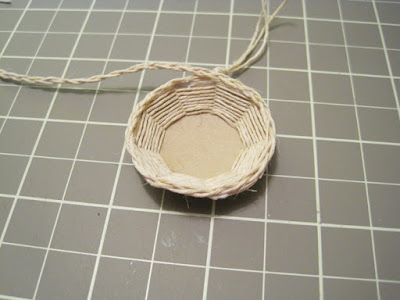
Begin to interweave the string around the pattern. Go over and under the tabs.

As you weave around gently pull a bit tighter to make the tabs move upward to form the dish shape. Push the string down on the tabs as you go if there are gaps.

When you get to the height you want, cut the string and put a dab of glue on the end of it and tuck it under the other strings with a toothpick.
Trim away all the excess paper with scissors, flipping the basket up and over for each tab so you can see the highest strings on the tabs and don’t accidentally cut them.

Cut three 8” pieces of string and tie a knot at the end. Tape it to your cutting board.

Braid the string nice and snug and then tie the end into a knot.

Put some glue on the end, just before the knot, on the top and bottom of the braid with the toothpick.

Run Tacky Glue around the top of the basket using your toothpick.

Lay the braid along the glue, pressing it down as you go.

Snip of the glued end of the braid in the center of the area you glued before the knot. Press it to the basket edge.

Put glue under and over the other end of the braid right where it meets the end you just cut. Snip in the center of that glued area and press it to the end to complete the circle.

Spread some glue on the base and begin wrapping the string from the outside in, until it’s completely covered. Do the same for the base if you wish.

You can use a toothpick to move the strings on the tab if you see areas where the paper shows through. This is why you want a paper close in color to the string.

Make your template small for a smaller bowl. You can also use embroidery thread or even thin yarn in pretty colors for this project. If you do that then you can put coordinating fabric on the base instead of wrapping the thread.
Get your groove on and have fun weaving!