Labels

Wednesday, June 23, 2021

New Blog!

  Be sure to follow my newest work at my new blogsite, miniatures by auralea!


Wednesday, April 29, 2020

Stone floor in miniature

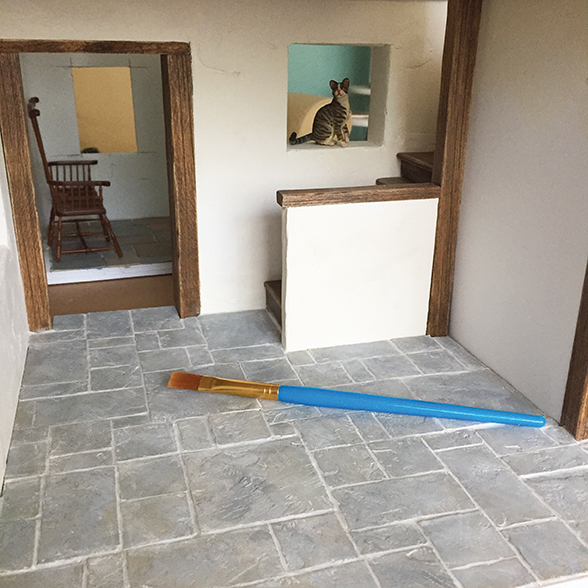
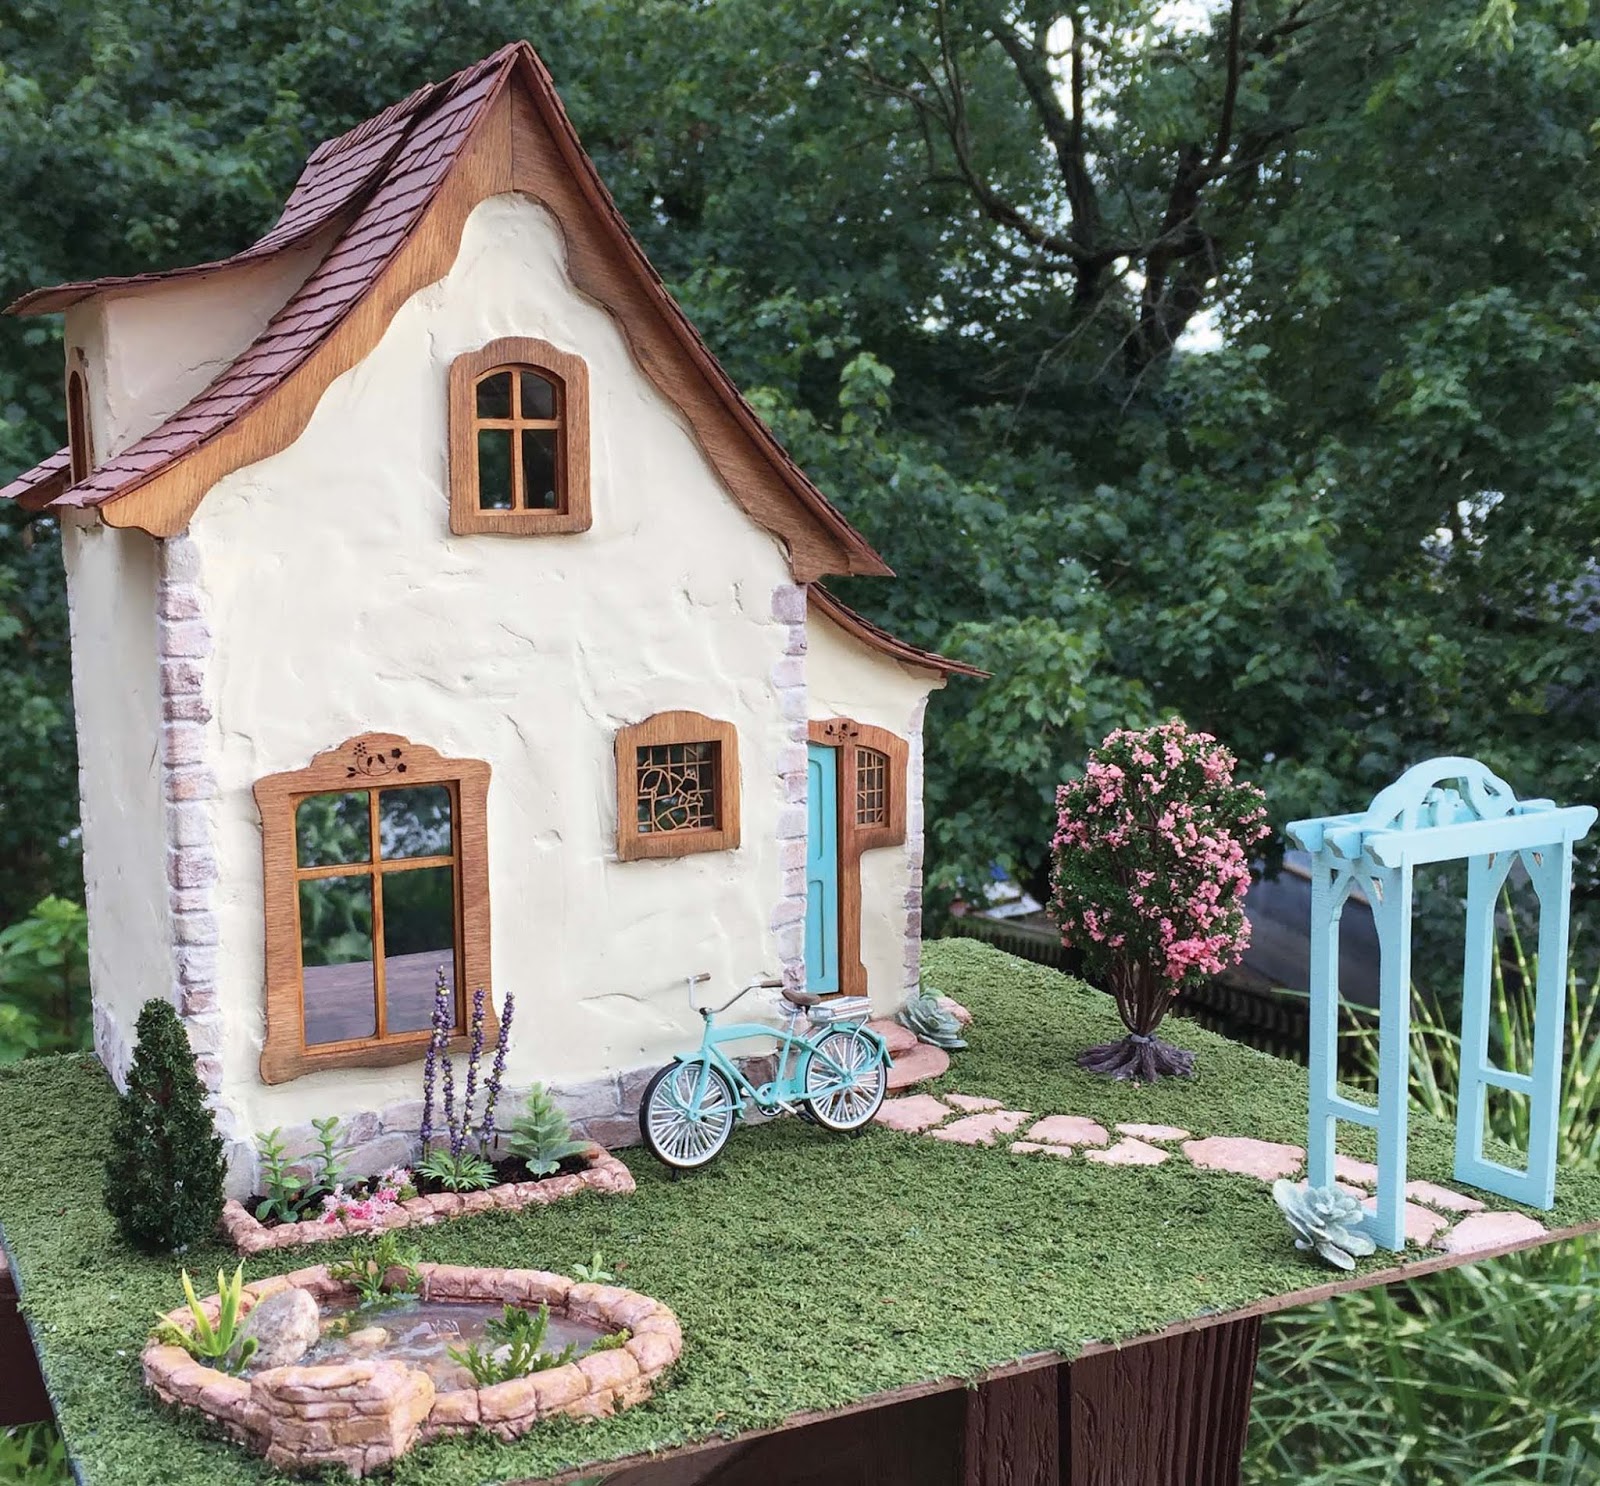
My most recent project has been an old French stone cottage. I had a vision in my mind of the stone floor I wanted and decided to take some time to try some new techniques.
The first two didn’t turn out to match my vision so I went back to my original idea of using my slate roof method, but for stone flooring (I used the slate roof method for a tutorial in AM179). I will share the other two experiments at the end of this tutorial.


Save your cereal boxes or any other similar boxes for this project. Trim them out using the larger front and back pieces.

I used wood filler for this because it is more durable. Spackling paste is more likely to chip over time. Spread it onto the unprinted side of the cereal box in thin layers with a putty knife. My knife was about 2” wide.

Work the floor so it has stone-like markings. Try to avoid long lines that the knife may leave. If you are going for a limestone look, use a bristle brush to leave tiny patches of holes here and there. Study a real photo for your effect. Or you can paint these in later.

Let the sheets dry to the point where you can lay something heavy on them to keep from warping. Then leave them for a day. Once completely dry, you can shape the edges to get any curve out. The filler is mildly bendable, but be gentle.

Take them outside, preferably in an area that you can leave messy and let the rain clean later. Use a fine sandpaper and start sanding each sheet in a small circular motion. Blow/wipe the dust away and check for markings. You don’t want to see sandpaper marks. If you do then use a finer sandpaper. You might want to wear a mask if you’re sensitive to dust.

Keep working the sheet until you have a nice stone texture. You may want a smoother stone or a rougher one. Sand the sheets based on your vision. Save a test sheet if you want to experiment with painting later.

Once you have cleaned your sheets, sharpen your blade on your craft knife and cut your shapes. 
I have been using the same blade for months, just get a sharpening stone (this is better for the environment and your budget)!

You can cut some regular paper to different sizes if you are not sure about the look. You want to get the right measurements before you cut your sheet.

You can either glue your stones directly in your room or glue them onto a mat board sheet that is cut to size.

Once your stones are down and the wood glue is dry, use your knife to make some texture around the edges of each stone.

Painting
Before you do anything else, give the entire floor a thin coat of Mod Podge. Don’t leave brush marks!


 Pick out the three colors you want. I used grey, cream and a light brown for my floor.

Paint your most prominent color first. Cut with white if any are too dark. Don’t try and be perfect just start working in the colors. I let some of the filler color show through at times. It added to the effect 
I wanted. Blotch on some tan and cream paint here and there. Add smaller dotted spots with a coarse, dry brush. Experiment!

Once my stone effect was where I wanted it to be, I dry brushed on some white paint to pull out the texture. This will dry darker than it goes on.

Grouting
Use a pallet knife, damp rag and a coarse brush to apply the ‘grout’ (spackling paste).

Work in small areas at a time. I cut down a small coarse paint brush and dampened it. Then I used. it to scrub off some of the spackle around the edges and wiped up with a damp rag and my fingers. Be gentle, you don’t want to rub your paint off.


Once it’s dry, use a small brush and give it a gray wash or whatever color grout you want. If you want white, you are finished grouting!

Finishing
To get that worn floor effect I gently buffed my stones with a cotton rag (old T-shirt). Matt varnish is still too shiny and looks like rubber. This buffing method makes a gorgeous effect on acrylic paint.

Other experiments
I tried the first technique because I was worried the wood filler might chip if I moved mini furniture over it (this was before I thought of using Mod Podge).
I used ElastoPatch by Dap. I used this in my real home to patch a ceiling crack and had no idea it would be so difficult to sand. This stuff dries like stone! But if you have an old house, it’s great for cracks because it has some stretch to it. So as the house is settling the compound will last longer than spackle will.
I used the same method as for the filler, but you can’t really sand this so it looked more like concrete in the end. I still may use it as if it was more recent stone added to the newer entry room for the old cottage. My paint job may save it, we will see.
My second attempt was Paperclay. I used this successfully in the past for ‘exterior’ brick and stone work in miniature. But because this shrinks while it dries, it started to warp my entire dollhouse base! No Bueno! I ripped it out and managed to get most of the warp out of the house with wood glue and weights.
Never feel you have failed when experiments go wrong. Now I know what to use if I want a cool concrete effect and I understand the compound material more, so it goes into my mini maker database to use for future projects.
As for Paperclay, I will keep using it for individual stones or brickwork. I work within my skill set and let the materials guide me. When you try to force something it will always fight back so keep experimenting, but without any pressures and you will have more fun. Art is suppose to be expressive and fun!
Follow me on Instagram at @auraleakrieger!

Monday, April 20, 2020

miniature dollhouse pond


In my previous post 
I showed you how to sculpt with Paperclay and paint once dry. I used the same paint for the stone wall around this pond as I did the garden beds.
When I sculpted this pond, I did it in two layers using wood glue in-between. I adhered it to the board with the same glue. This is super important because Paperclay shrinks while drying!


Paint the base of your pond in the color of your choice. I went with a dark brown swirled over my dark blue/green base. Be sure to add this color to the waterfall area as well. Constant water flow would make it grimy. Let the paint dry. Unfortunately my base started to crack along with the Aqua Magic as it cured so always test your products first! I just reapplied in all the cracks to try and save it. No detailed instructions came with the product so I may have applied it too thick.


Gather some greens and rocks for your pond interior. I had a few cracks in my pond wall and filled them with some of the greens using Tacky Glue. 

Glue all your components in to your liking. Use tweezers for this! Let the glue dry.


I didn’t want to sculpt 1:12 scale fish so I opted to paint them. I used a bright orange and a dark terra-cotta paint. Instead of my brush I used a toothpick and scooped up a blob, put it down and pulled away with the toothpick to make the tail. Practice what method works for you before painting in the pond. 


I also dotted a little white for the fishes head using a toothpick.
I made a few darker fish as well. You can blend the two colors together and add some shadowing on  your fish if you like, but at this small scale I didn’t feel it was needed.

Now let everything dry. I jumped the gun, so my Tacky Glue bled in the ‘water’ treatment I used. I had to add more greens to cover it just in case. So please let everything dry for less fixes.

I had Aqua Magic on hand and used it for my ‘water’. But there are lots of options for this effect. You can use a Resin mix (but it does tend to bubble so you may need to lift and drop your pond on a hard surface to get the stubborn bubbles out). Walmart has an affordable acrylic water kit. Other diorama specialists offer kits and products that will work. Research on Google. There are a lot of great video tutorials out there!

I poured in the product and let it set for a few hours then made some textures with a toothpick in the waterfall area, added more product and did it again after a few hours. Pour a little over your waterfall area too.


I let it dry overnight and, in that same area I had textured, I was able to pull some clumps up with a toothpick and place them in the water fall area.

Then I poured a little more product over them and let it flow into the pond. Then, after a few hours, I textured it a little. 

  Another option for the waterfall area is to use a glue/bonding agent that is clear with a jelly-like texture. There are a few out there but I have forgotten what they are called. I got one from the hardware store years ago. If you are familiar please write in and I can share in our next issue.

If you plan on adding lily pads, do this after your last pond application sets for a few hours. Place with tweezers and tap in. Don’t forget to add a frog in there somewhere! Visit my Instagram @auraleakrieger.

You can purchase your own cottage kit at www. 
redcottageminiatures.com.

Tuesday, April 7, 2020

Dollhouse landscaping


I am sharing how I made some  landscaping for this half-inch scale Nutcote cottage kit. The wall is similar to how I made the house exterior only the ‘stones’ will be smaller. Be sure to find a reference photo to refer to while you work.


First, I used a grey chalk pencil to mark out where I want the garden walls. I will also be making a wall for a fish pond, but that tutorial will be next month.


Begin by shaping a piece of Paper Clay to your wall shape. Then cut the sides with a clay knife.

I ran water over the top and sides to be sure my clay doesn’t dry while working. The more you work this clay in your hands the faster it will dry.

Brace one side with your finger and score indents for the space between the rocks. Smooth over back and forth with your fingers to flatten the excess clay that’s rose up.


Use a clay tool (or toothpick) to make the base indent of the top rocks along the outside of the wall.


 Slowly work the shape of the top stones with your clay tool or toothpick. Add the lower stone shapes as if they are stacked stones. Note that the stones would not be perfectly up against each other. So make holes in-between each by pushing the clay away from each corner of each stone.

 Crumple up some foil and press it against your cutting board to get it flat. Then pinch the top and press the base against your wall along the top and along the top corners of the sides.

 Once you are happy, put wood glue down where the wall will go. Use a clay knife to separate the wall from the cutting board and place it into the glue.

Painting stone

 Mix some Brown Iron Oxide with a good amount of water. Brush onto the stone being sure to cover the sides as well as the top of the stones.

  Go over with a wash of Khaki, on only parts of the wall, to add more color. Let dry. Paint the inside of the beds dark brown. I will fill the garden beds with a mixture of tea leaves and white glue, leaving small holes to add flowers later.


Applying grass
Grind up some reindeer moss in a coffee bean grinder on medium to get it fine. You could grind some fine as well and mix the two together.


 Add white glue to the surface and sprinkle the moss on and press it. Shake the base over paper and collect extra to reuse.


 My surface was already close to green but I would recommend painting your grass surface a dark green before applying the moss.

Next time I will share how I made a pond with a small waterfall in the corner of the garden.
If you want to follow along with me through this year, you could purchase your own cottage kit at www. 
redcottageminiatures.com.

Wednesday, March 18, 2020

Stone path for a dollhouse/miniature


This is how I made a stone path to lead up to the Nutcote cottage kit from Red Cottage Miniatures. The kit came with some laser cut wood steps so I used them as a template and traced them on some rolled out Paperclay. However, I made the stone path free hand. Keep in mind that his technique will work in any scale. I placed my cottage on the base for the layout but will not be gluing it down incase I sell this piece when it is finished. This way it will be easier to ship and all my hard work will stay safe.


 Outline where your path will be on your surface. Use a pencil! I used a pen and it kept bleeding into my clay. I temporarily put my steps in place and started about 1/8” away from them.

  Start by cutting a palm full of Paperclay from your package and then seal up your bag. Knead the Paperclay with your fingers on wax paper and then roll it out to about 1/8-1/16” thick. I am using a plastic clay roller. You could also just use a bottle.

 I cut out my step tops and set them aside to dry. Then I laid a piece of thin clay over my path outline and started cutting stone shapes like a jigsaw puzzle, but I left room in-between for the grass to grow in between the stones. I have built stone paths in real life and know that they are never a perfect fit unless it’s an artificial path so don’t worry if there are uneven gaps because this will only add to the charm. I would take an organic natural stone path over a machine made one any day!


 When you get about 4 stones cut to shape, smooth their sides and spread wood glue down and place them down pressing very gently.  Add any texture you may want to make it look like a specific stone. I used a crumbled up piece of fabric I had on hand. Paper may be too sharp but you could use foil. If you use foil, you need to really crumble it up and press it as flat as you can on a hard surface so the texture is very faint and doesn’t cut into the clay.


 While it is drying, go back and check on it because Paperclay shrinks and you may need to pat it down if it curls while it is drying, but only if you missed gluing an area. For the step tops, I kept flipping them over while they dried because they are not glued down yet and were curling up. Once dry, I glued my steps together using the Paperclay pieces for the tops and the step base wood pieces that came with the kit. Then glued the steps in their place with a weight on them.

Painting stone
 Mix some Ceramcoat Brown Iron Oxide with a good amount of water to make a wash. Brush onto the stone being sure to cover the sides as well as the top of the stones.


 Go back over with a wash of Ceramcoat Khaki but just on certain parts of each stone to add another layer of color.


 I dabbed the stone with a cotton cloth to get a nice blend. Let dry.

Applying grass
 Grind up some reindeer moss in a coffee bean grinder to get it nice and fine.


 Add some glue around the stones with a toothpick. If you have Elmer’s white glue the cap will be narrow enough to apply without a toothpick.


 Apply the fine reindeer moss material into the glue. Press with your fingers to get it deep in the gaps.

 Go in with small scissors if there are any stragglers that look too bulky.

Looking back,  I should have painted the board in a matching green first!