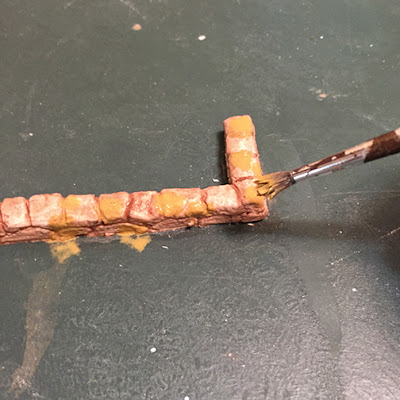
I am sharing how I made some landscaping for this half-inch scale Nutcote cottage kit. The wall is similar to how I made the house exterior only the ‘stones’ will be smaller. Be sure to find a reference photo to refer to while you work.
First, I used a grey chalk pencil to mark out where I want the garden walls. I will also be making a wall for a fish pond, but that tutorial will be next month.
Begin by shaping a piece of Paper Clay to your wall shape. Then cut the sides with a clay knife.
I ran water over the top and sides to be sure my clay doesn’t dry while working. The more you work this clay in your hands the faster it will dry.
Brace one side with your finger and score indents for the space between the rocks. Smooth over back and forth with your fingers to flatten the excess clay that’s rose up.
Use a clay tool (or toothpick) to make the base indent of the top rocks along the outside of the wall.
Slowly work the shape of the top stones with your clay tool or toothpick. Add the lower stone shapes as if they are stacked stones. Note that the stones would not be perfectly up against each other. So make holes in-between each by pushing the clay away from each corner of each stone.
Crumple up some foil and press it against your cutting board to get it flat. Then pinch the top and press the base against your wall along the top and along the top corners of the sides.
Once you are happy, put wood glue down where the wall will go. Use a clay knife to separate the wall from the cutting board and place it into the glue.
Painting stone
Mix some Brown Iron Oxide with a good amount of water. Brush onto the stone being sure to cover the sides as well as the top of the stones.
Go over with a wash of Khaki, on only parts of the wall, to add more color. Let dry. Paint the inside of the beds dark brown. I will fill the garden beds with a mixture of tea leaves and white glue, leaving small holes to add flowers later.
Applying grass
Grind up some reindeer moss in a coffee bean grinder on medium to get it fine. You could grind some fine as well and mix the two together.
Add white glue to the surface and sprinkle the moss on and press it. Shake the base over paper and collect extra to reuse.
My surface was already close to green but I would recommend painting your grass surface a dark green before applying the moss.
Next time I will share how I made a pond with a small waterfall in the corner of the garden.
If you want to follow along with me through this year, you could purchase your own cottage kit at www. redcottageminiatures.com.


Te queda genial, gracias por el paso a paso,buen día
ReplyDelete¡Buen trabajo!
ReplyDeleteLove how you did the stones Auralea! A garden is the finishing touch for a dollhouse and I'm eagerly looking forward to your pond tutorial as I LOVE water effects in miniature.
ReplyDeleteDear Auralea, I am interested in your Gottschalk renovation. Could you post more photos? How can I recreate the textured cardboard roof? Do you know? Also do you sell the flooring and/or wallpaper? I found a Gottschalk house recently and I want to bring it back to life!! Your blog is an inspiration...
ReplyDeleteI printed my own wallpaper and flooring. I don;t know how you could create the roof. I have posted all the photos I have at the moment. I would just recommend continuing to research and try things until you are happy! Have fun with it!
Delete